Camp Meal
Dutch Oven Roasted Camp Chicken
This is an easy recipe for someone just starting to Campfire Cook in a Dutch Oven. This chicken recipe will make you look like a great chef. Put this together, add heat and forget it. Come back later and it is done and it taste good. This is the kind of recipe when “Simple” is “Better”.
4 – 5 lb Chicken Broiler or Roaster
Stalks of Celery
Garlic Powder
Salt & Pepper
Vegetable Oil
To Butterfly a Chicken – Learn More Here
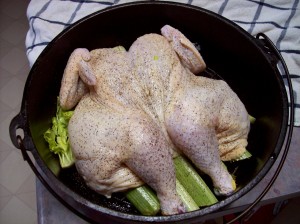
Lightly oil chicken, this will help brown and crisp the skin. Sprinkle both side of the chicken with salt, pepper and garlic powder to taste. Cut celery stalks into thirds.
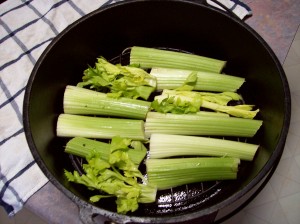
Lightly oil a 12″ Dutch Oven. Add the cut celery in a flat layer on the bottom. The celery will act like a trivet and keep the chicken raised up off the bottom on the Dutch Oven. Lay chicken on top of vegetable and put lid on Dutch Oven. (We used a bakers rack to get more space under the chicken)
Cooking Tip: Position the chicken so it does not touch the lid. If it touches the lid, put a small piece of foil at that point. Do not put charcoals directly on the lid over the chicken where it is touching. This will burn it.
In the oven, bake the chicken at 350° for 1-1/2″ hour, check for doneness (180°) or till the juices run clear. Cooking Outside, add a ring of charcoals around the lid and 3 or 4 in the center next to the handle. Add 5 underneath in a circle towards to outside edge. After about 30 minutes rotate to lid 90° and then rotate the whole oven 90° as this help to even out the heat. Be sure to let the chicken rest for about 10-15 minutes before slicing.


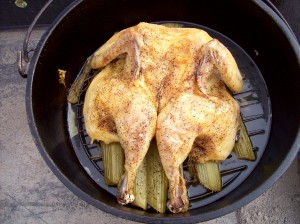
You can see in the final picture how the fat has melted out of the chicken and why it should be raised up. The chicken is very tender and pulls right off the bone, it does not get any better than this.
If you want barbecued chicken, Lightly brush sauce over the chicken during the last few minutes of cooking.
This dish has many variations. Change the spices and / or add salsa for an International flair.
Also, midway through the cook time a few redskins and other vegetables can be added the Dutch Oven.
I hope you enjoy this recipes.
Camp Cooking Made Easy
Camp cooking can be as elaborate or simple as you want it to be. If you want to prepare quick and simple but nutritious meals while you are camping, camp cooking doesn’t even have to require a fire. But if you are interested in fueling your camping trip with a feast, camp cooking can allow you to make hot, healthy foods that are as good as you can make them at home in your own kitchen.
Camp cooking does not have to be limited to sandwiches and baked potatoes wrapped in aluminum foil. Almost any cooking method you use in the kitchen can be duplicated around the campfire. For example, use a dutch oven or pit cooking to bake your food. You can also easily fry foods in a pan over a grill, or boil, braise and roast. What type of camping cookware is best for you? Camp cooking and clean-up can be easy or a hassle, it all starts with great camping equipment.
Some pots/pans come in sets that mate together or “nest” for storage and even allow you to tuck a canister of fuel inside them. This comes in handy when you’re looking to save room while camping.
Following are some camping items to take with you if you are planning on preparing some meals around the campfire. These common kitchen items will allow you to duplicate tasty meals while you are out of doors.
Salt and pepper
Other of your favorite herbs and spices
Cooking oil
Pot holder
Hand-held can opener
Aluminum foil
Tongs and spatula
Cutting knives
Cutting board
Mixing bowl
Paper or plastic silverware, plates and cups
If you have just a few campers and are looking for some simple camp cooking, try the easy and quick technique of tin can cooking. All you will need is a clean tin can a one gallon size can works well. Your source of heat can be a small campfire, or if wood burning is prohibited, a small buddy burner will work well, which can be found at sporting good stores or online. Place your meal in the tin can and simply heat the contents of your can over a flame. You will have a hot meal ready in minutes. This technique works great for soups, beans and tuna fish.
A more time-consuming camp cooking technique that also produces tasty meals is pit cooking. Pit cooking is great for items that can be wrapped in aluminum foil to be cooked. It is also a great camp cooking method if you are using a dutch oven or cast iron cookware. Pit cooking warms your food by heating rocks and coals that are buried in the ground. As the rocks cool off, their emitted heat cooks the food. To pit cook, first dig a hole that is about three times larger than your cookware. Line the pit with rocks and build a fire in the middle. Once the fire has burned rapidly for about an hour, push the hot coals and rocks into the center. Layer your wrapped food or covered skillets on top of the rocks and coals and place more on top. After a few hours, you will have some delicious camp food to enjoy.
Author: Philippe De Tiege
Article Source: EzineArticles.com

